Due to the EID vacation, our team will be out of the office from June 14th to 22nd. During this time, our support response times may be slightly delayed, but some of our support heroes will do their best to assist. Rest assured, we'll be back to full speed on June 23rd.

Table of contents:

See more

In the world of web design, creating user-friendly forms is essential for capturing valuable data and enhancing the user experience. One popular technique for optimizing Webflow forms is by dividing them into multi steps, making them more manageable and engaging for users. 

In this article, we will explore how to create a Webflow multi step form, a powerful visual web design platform that allows you to build stunning websites without coding. Whether you're a beginner or an experienced designer, this guide will walk you through the process of creating a seamless Webflow multi step form that will delight your users.

Understanding the Benefits of Multi-Step Forms

Improved user experience and engagement

Multi step forms enhance the overall user experience by breaking down a lengthy and potentially overwhelming form into manageable sections. Users are less likely to be intimidated by a long list of fields, which can lead to frustration or abandonment. By guiding users through a series of smaller steps, they are more likely to stay engaged focused, and feel a sense of progress as they complete each step. This can result in a more positive interaction with your website or application.

Increased form completion rates

When users encounter a long, single-page form, they may be more inclined to abandon it, especially if they perceive it as time-consuming or complicated. Multi step forms can increase form completion rates because they encourage users to start the process and continue through each step. Users are more likely to finish a multistep form when they feel they've made progress. Additionally, reducing the cognitive load by presenting only a few fields at a time can make the process less daunting.

Organized and focused data collection

Multi-step forms allow you to segment the data collection process, making it easier to categorize and organize the information you gather. This approach helps ensure that you collect all the necessary data while maintaining data accuracy and consistency. Each step can be designed to collect specific information, which helps keep the user's focus on one task at a time.

Planning Your Multi-Step Form

Planning your multi step form is a crucial step in ensuring it serves its purpose effectively and provides a positive user experience. Here are some key considerations and steps to help you plan your multi-step form:

Define Your Form's Purpose

Clearly understand why you need the form. What information are you trying to collect, and what is the ultimate goal of the form? Whether it's a lead generation form, a survey, or an application form, a clear purpose is essential.

Identify the Required Information

List the specific information you need from users. This includes both mandatory and optional fields. Be mindful of user experience and avoid requesting excessive or unnecessary data.

Break the Form into Steps

Determine how to divide the multistep form into logical steps. Each step should group related information. Consider the flow and order of steps, start with essential information, and progress to optional or supporting details.

Decide on Step Titles and Descriptions:

Each step should have a clear and concise title that indicates what the user should expect. Consider adding descriptions to provide context for each step's purpose.

Choose Input Types:

Select appropriate input types for each field within the steps. For instance, use text fields for names and email addresses, radio buttons for multiple-choice questions, and text areas for longer responses.

Set Validation Rules:

Determine which fields are required and enforce validation rules for data accuracy. For example, validate email addresses and phone numbers for correct formats.

Consider Error Handling:

Plan how to handle errors and validation messages. Ensure users receive clear and helpful guidance if they enter incorrect information or miss required fields.

Optimize for Mobile and Accessibility:

Ensure your multi step form is responsive and accessible. Test it on various devices and screen sizes to make sure it functions seamlessly for all users.

30+ Top-notch Webflow Templates

Take your website design to the next level with our stunning collection of Webflow templates. making them more manageable

Step by Step Guideline on How to Create Webflow Multi Step Form

Step by Step Guide on How to Create Webflow multi step form:

Step 1: Add a script to your page's source code.
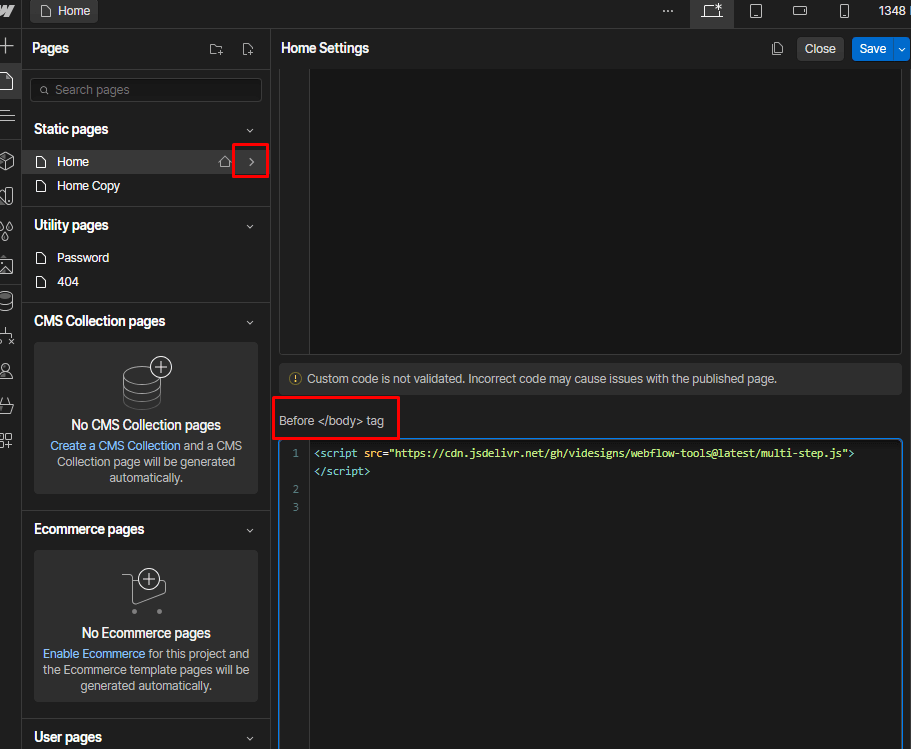
Add a script to your page's source code

The first step is inserting the script into the "Before </body> tag" in the page settings. This code will be placed within the page that will host your multi-step form.

<script src="https://cdn.jsdelivr.net/gh/videsigns/webflow-tools@latest/multi-step.js"> </script>

Step 2: Add a Form to the Page
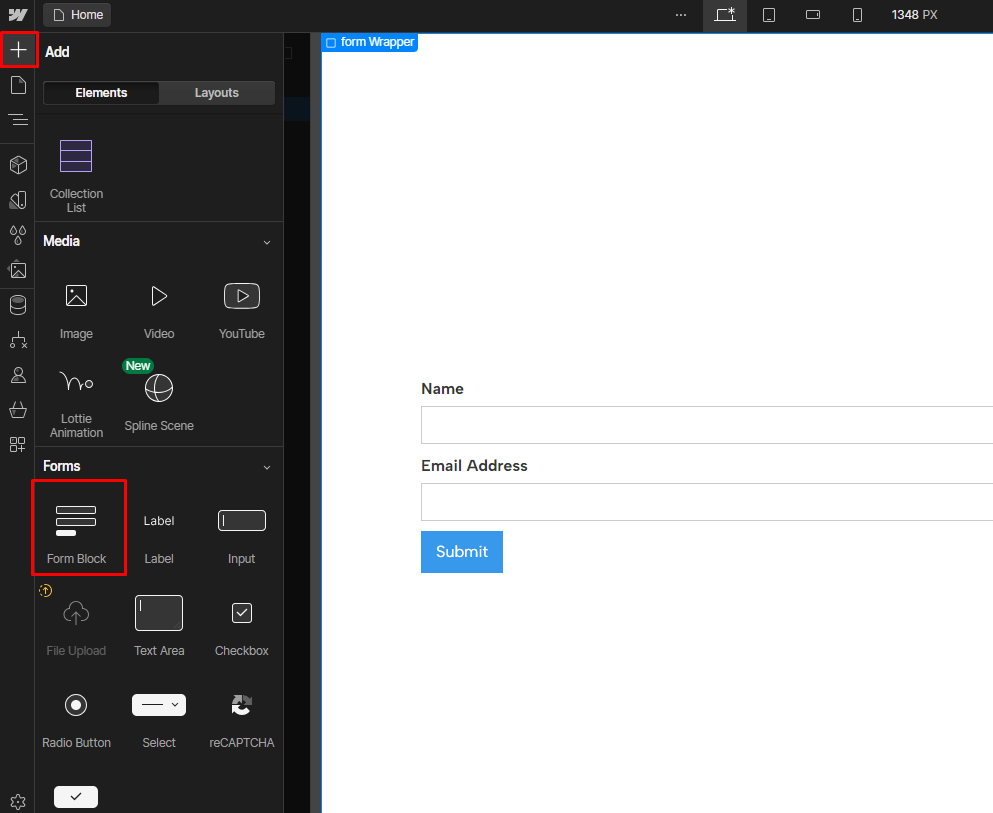
Add a Form to the Page

After that, you have to use a Webflow form on your webpage. When you do, you can delete everything inside the 'Form' section (except the 'Form Block'). We also suggest naming your 'Form Block,' 'Form,' 'Success Message,' and 'Error Message' parts.

Step 3: Create a Custom Attribute and Add It to the Form
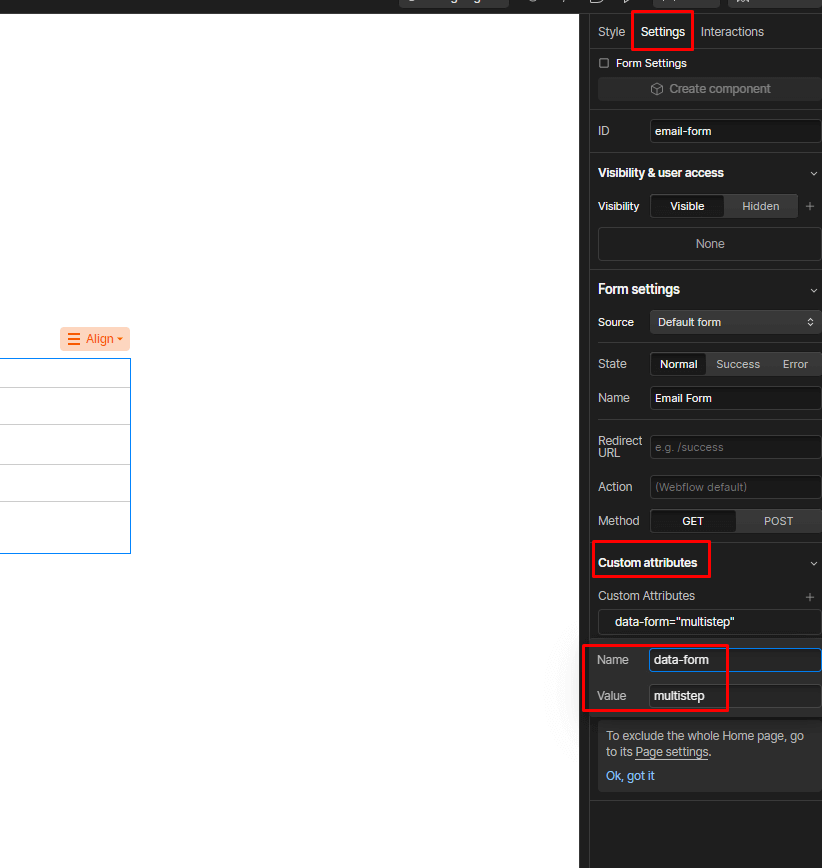
Create a Custom Attribute and Add It to the Form

After renaming the "Div Block" to "Form," access the element's settings. Under the "Custom Attributes" section, you should include the following:

Name: data-form

Value: multistep

Step 4: Include a Div Block for Every Step.
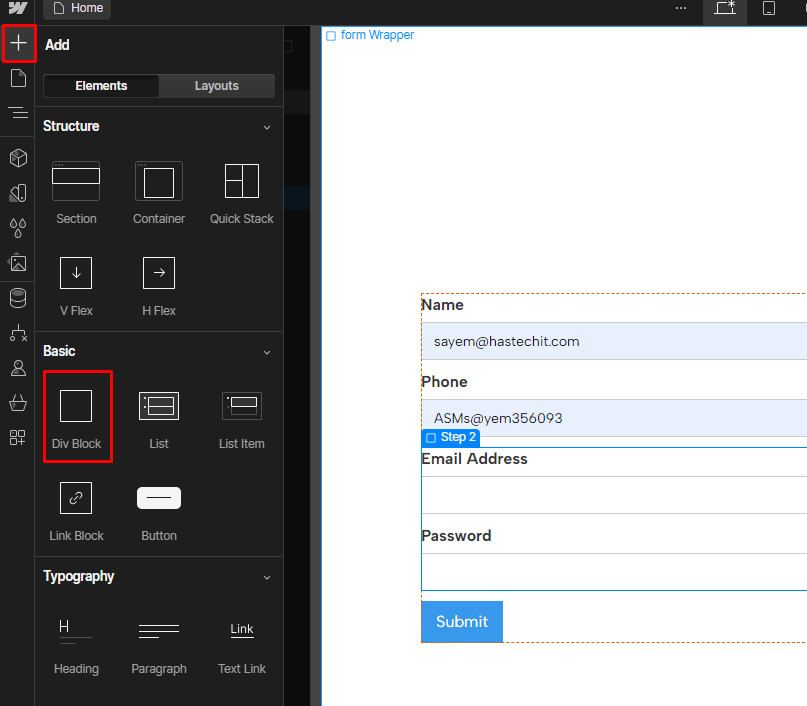
Include a Div Block for Every Step

Within the "Form" div, you will need to insert as many Div Blocks as there are steps in your multi-step form. For instance, add three Div Blocks if you desire a multi-step form with three stages. You can assign the same class to each Div Block, for example, "contact_step-wrapper." Each of these div blocks should have the following custom attribute:
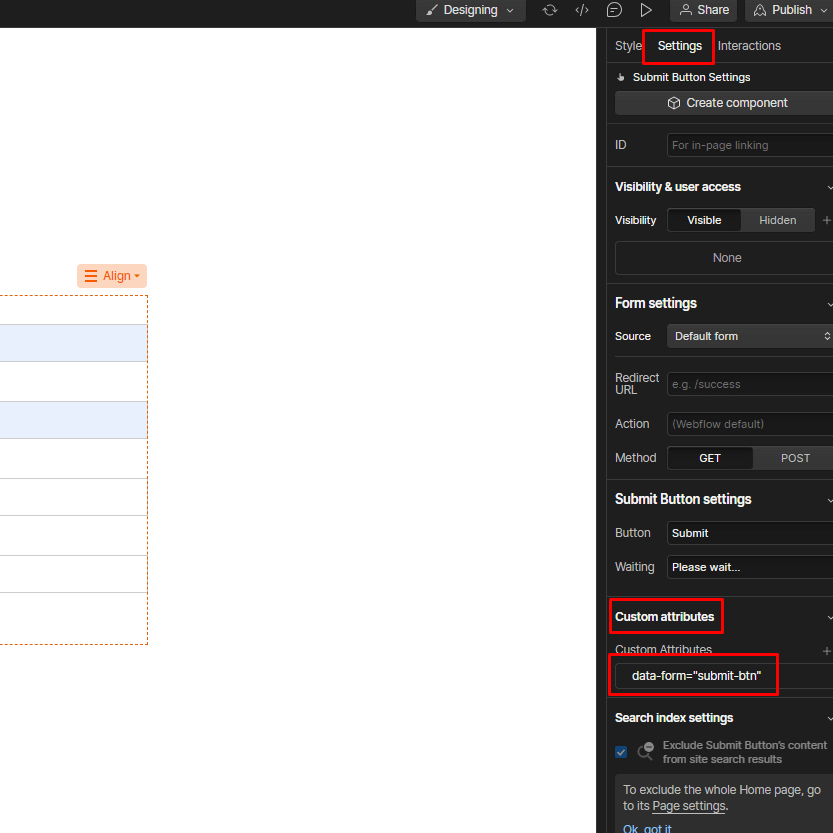
Name: data-form

Value: step

Step 5: Customize Your Steps
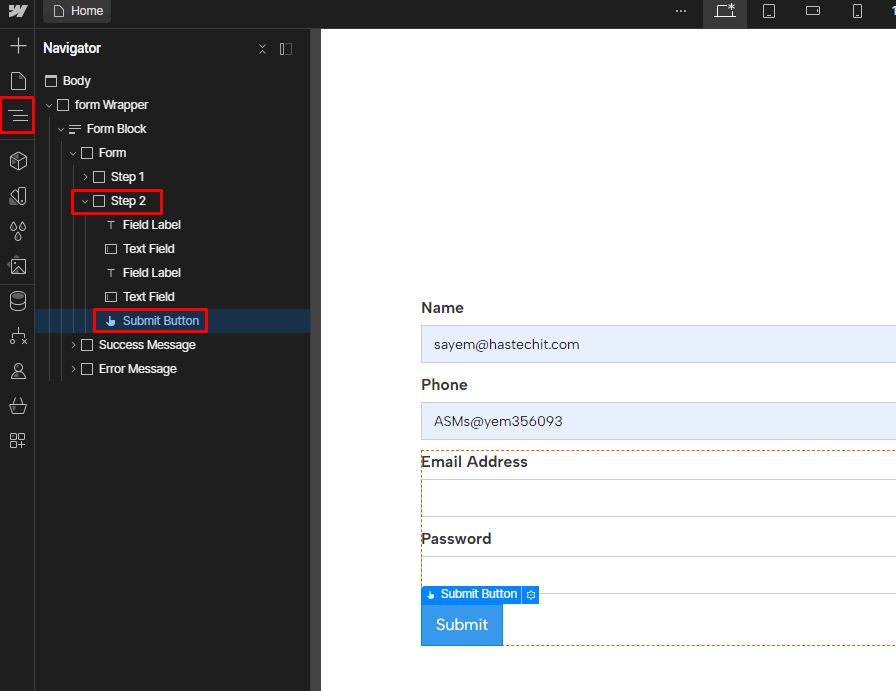
Customize Your Steps

In each Div Block representing a step, insert the desired fields and customize the design. Insert a "Submit Button" in the last step.

Step 6: Add a Custom Attribute for the "Submit Button"
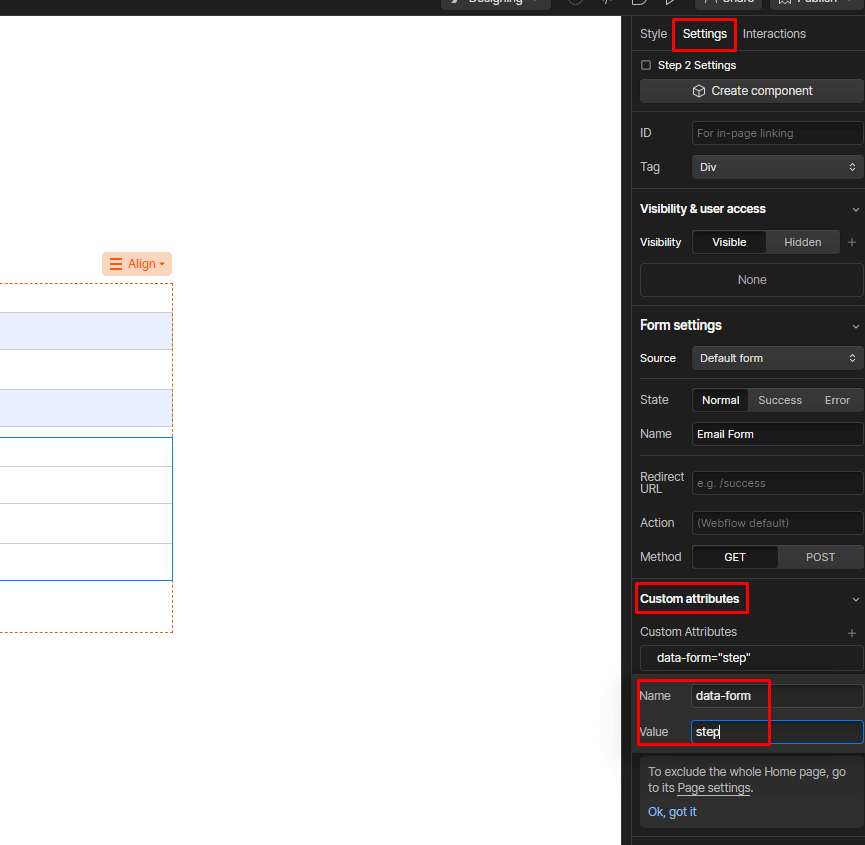
Add a Custom Attribute for the "Submit Button

Select the "Submit Button" element, and add the custom attribute:

Name: data-form

Value: submit-btn

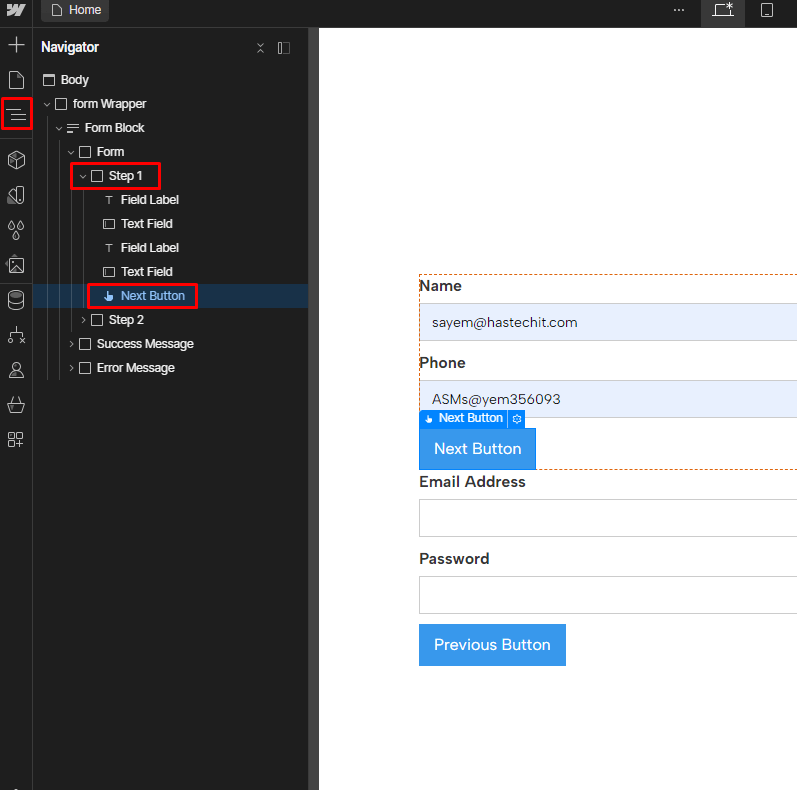
Step 7: Customize Buttons for Navigation
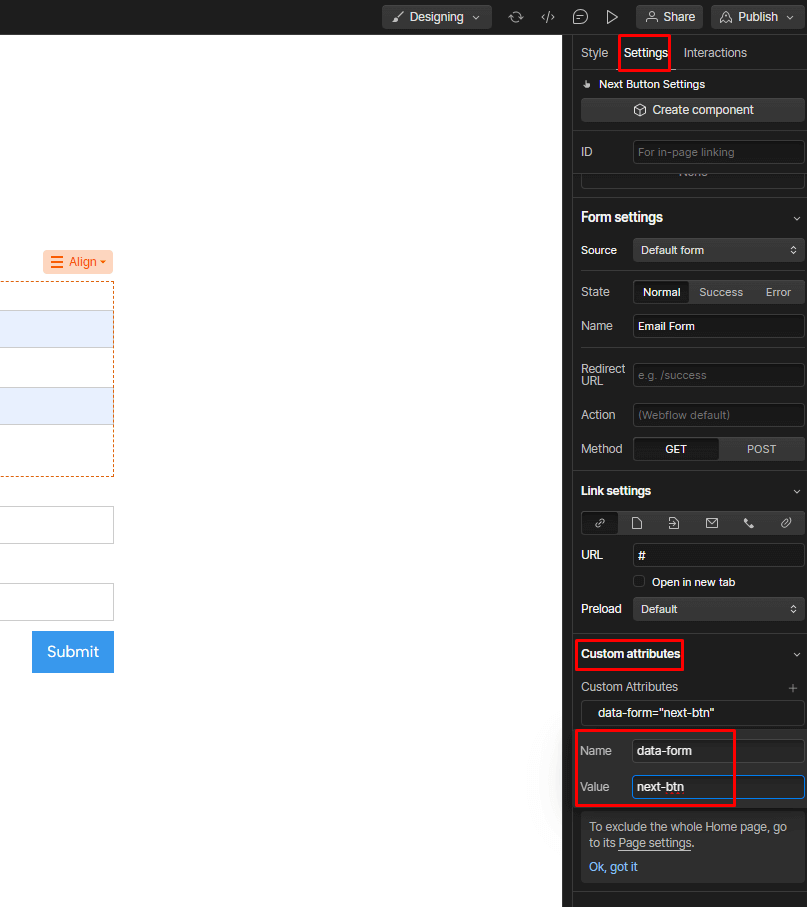
Customize Buttons for Navigation

Add buttons in your form block to move between steps. You can have buttons for moving forward or backward.

  • Button to Go to the Next Step:
Button to Go to the Next Step

Add custom attribute:

Name: data-form

Value: next-btn

  • Button to Return to the Previous Step:
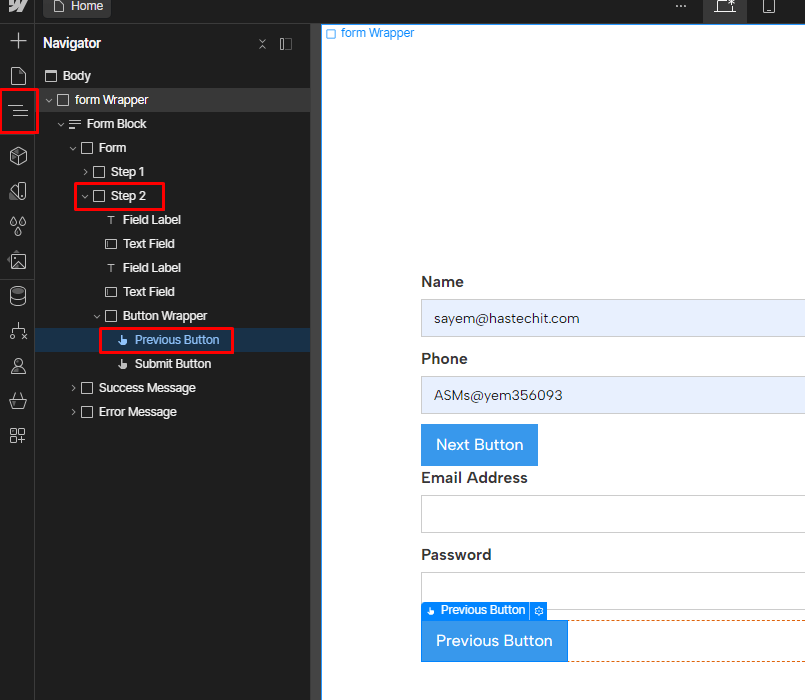
Button to Return to the Previous Step

Add custom attribute:

Name: data-form

Value: back-btn

Step 8: Specify the Fields You Need.
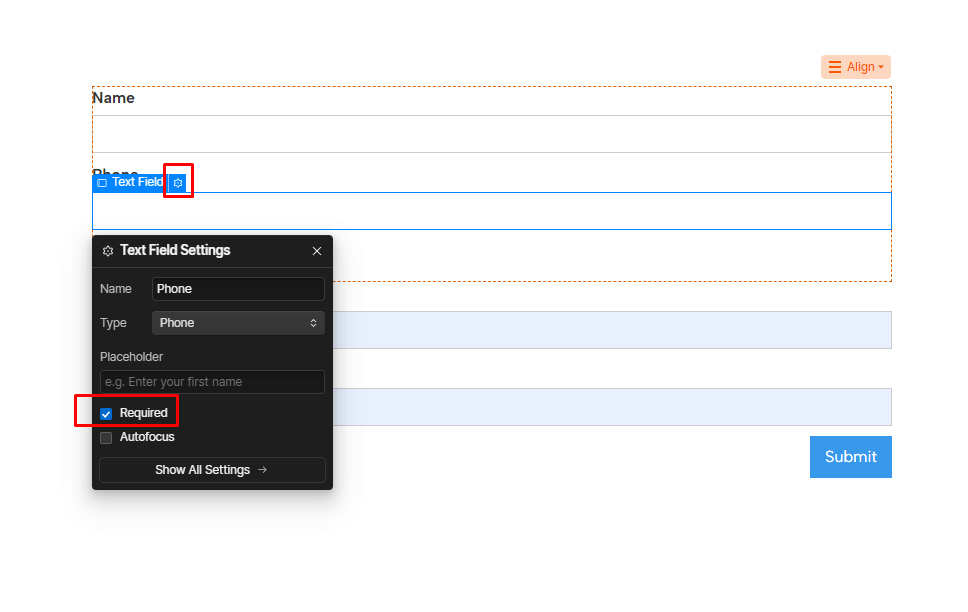
With this form, users won't be able to advance from one step to another unless they've completed the mandatory fields of the current step. To enable this functionality, ensure the "required" option is selected in your input settings. Note that this feature currently doesn't work with "Email" and "Phone" types, so you should use "Plain" types for these fields.

Mandatory Field in Webflow Form:
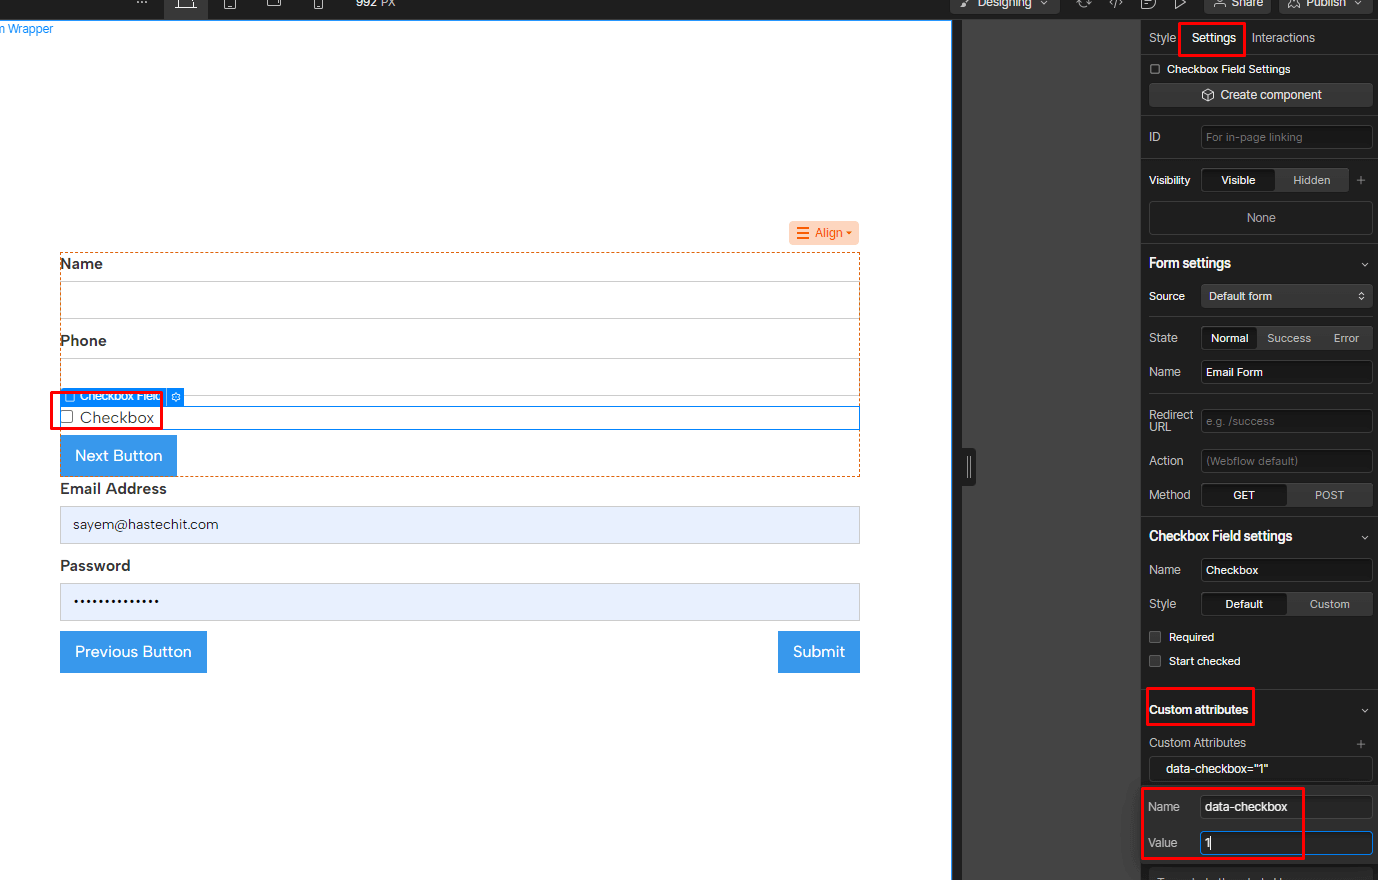
If you wish to require users to check a specific number of checkboxes before proceeding to another step within the step's parent div (e.g., "contact_step-wrapper" in our example), you should add the following custom attribute:

Name: data-checkbox

Value: n (minimum number of checkboxes to check)

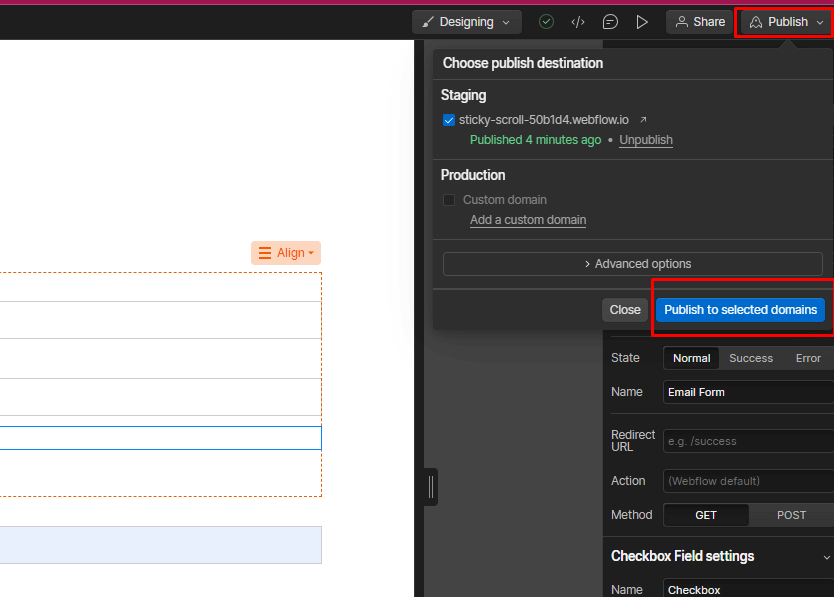
Step 9: Publish Your Project
Publish Your Project

You can't preview the active multi-step form in the Designer. Publish your Webflow project to test it. The steps will be automatically hidden on the live site based on the code.

30+ Top-notch Webflow Templates

Take your website design to the next level with our stunning collection of Webflow templates. making them more manageable

Frequently Asked Questions

Can I customize the design of each step in a multi-step form?

Yes, you can fully customize the design of each step in your multi-step form in Webflow. You can style form fields, buttons, and other elements to match your website's design.

How do I add validation to a multi-step form in Webflow?

You can add validation to your form fields in Webflow by setting them as required. Webflow's built-in validation will prevent users from progressing to the next step if they haven't filled out the required fields.

Can I track user progress in a multi-step form in Webflow?

Yes, you can track user progress by using interactions and custom code to update progress bars or step indicators as users move through the form.

How do I test and optimize a multi-step form in Webflow?

Test your multi-step form thoroughly, checking for errors, responsiveness, and user experience. Use A/B testing to optimize the form for better conversion rates and user satisfaction.

Bonus: Recommended Webflow Templates

Qlonil - Retail Website Template
Qlonil - Retail Website Template

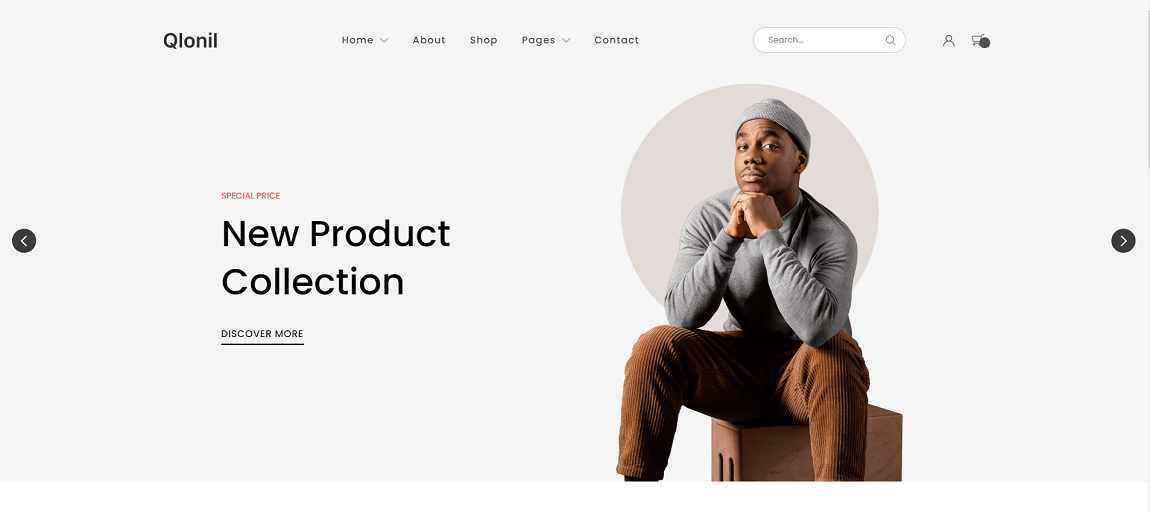
Qlonil - Retail Website Template is a Webflow template that simplifies the launch of an online retail store with its comprehensive feature set. It boasts static pages, including three homepage choices, a shop page, and a blog page. The CMS collection includes author pages, blog categories, tags, team member profiles, and blog post pages. 

Notably, it offers a responsive design, ensuring seamless viewing across all devices. With customizable aesthetics, eCommerce functionality, and SEO-friendly attributes, the Qlonil - Webflow eCommerce Template is the ideal choice for those seeking a user-friendly eCommerce platform.

Highlighted Features:

  1. Customizable look:
  2. eCommerce capabilities
  3. SEO Friendliness
  4. Responsive Layout
  5. Blogging capabilities

Price:

Regular License: $79

Farnic - Furniture Website Template
Farnic - Furniture Website Template

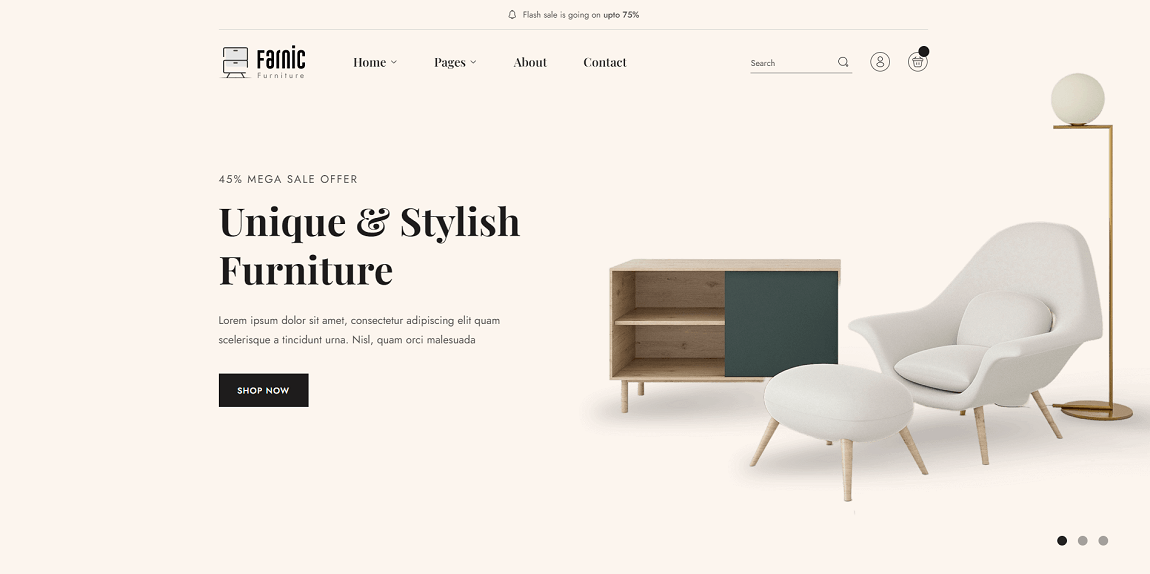
The Farnic furniture website template offers a seamless experience for setting up an online store. It combines a visually appealing website with seamless functionality, all within a responsive design. Powered by advanced Webflow CMS technology, managing your site becomes intuitive.

Farnic ensures easy customer attraction through SEO-friendly coding and robust eCommerce support. Experience retina-ready visuals, lightning-fast loading speeds, and eCommerce readiness. With Farnic, managing your online store is a breeze, allowing you to relax and witness your business thrive!

Highlighted Features:

  1. Retina Ready
  2. Fast Loading Speed
  3. eCommerce Ready
  4. SEO Friendliness
  5. Responsive Layout

Price:

Regular License: $79

Pinaf - Florist Website Template
Pinaf - Florist Website Template

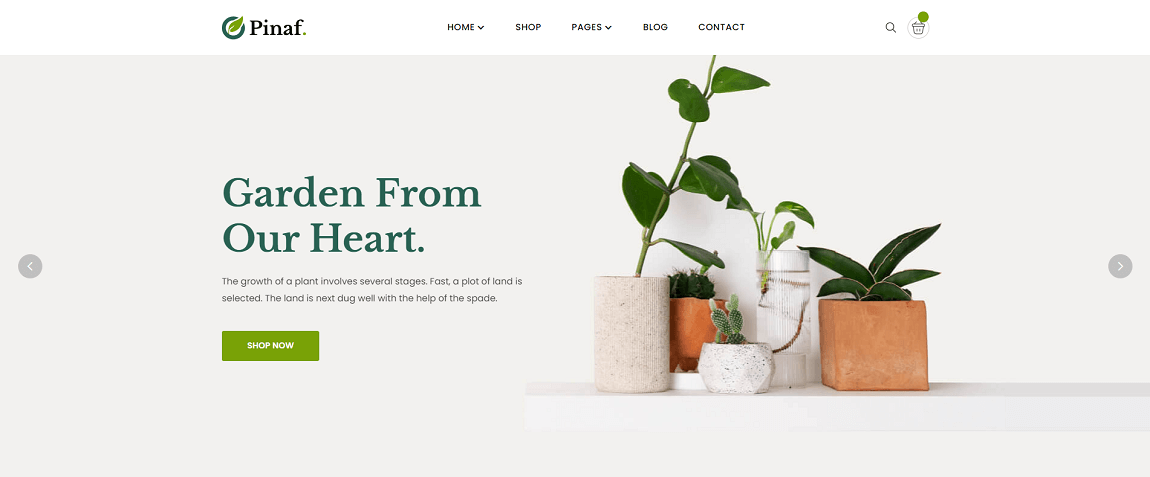
Discover the Pinaf Florist Website Template, designed to showcase the beauty of nature elegantly. This professional eCommerce template, powered by Webflow, empowers you to establish and oversee your online store effortlessly. It's adorned with captivating imagery of petite trees, blossoms, and plants. 

Pinaf offers complete customization, ensuring it aligns with your unique needs and preferences. Leveraging Webflow's CMS and eCommerce capabilities, managing your online store is a breeze. 

Furthermore, its speed-optimized design guarantees a swift and efficient shopping experience for your customers. The Key features include 100% customization, Webflow CMS & eCommerce integration, and top-notch speed optimization.

Highlighted Features:

  1. 100% Customizable
  2. Webflow CMS & eCommerce
  3. Speed Optimized
  4. SEO Friendliness
  5. Seamless Animations

Price:

Regular License: $79

Purely - Food Website Template
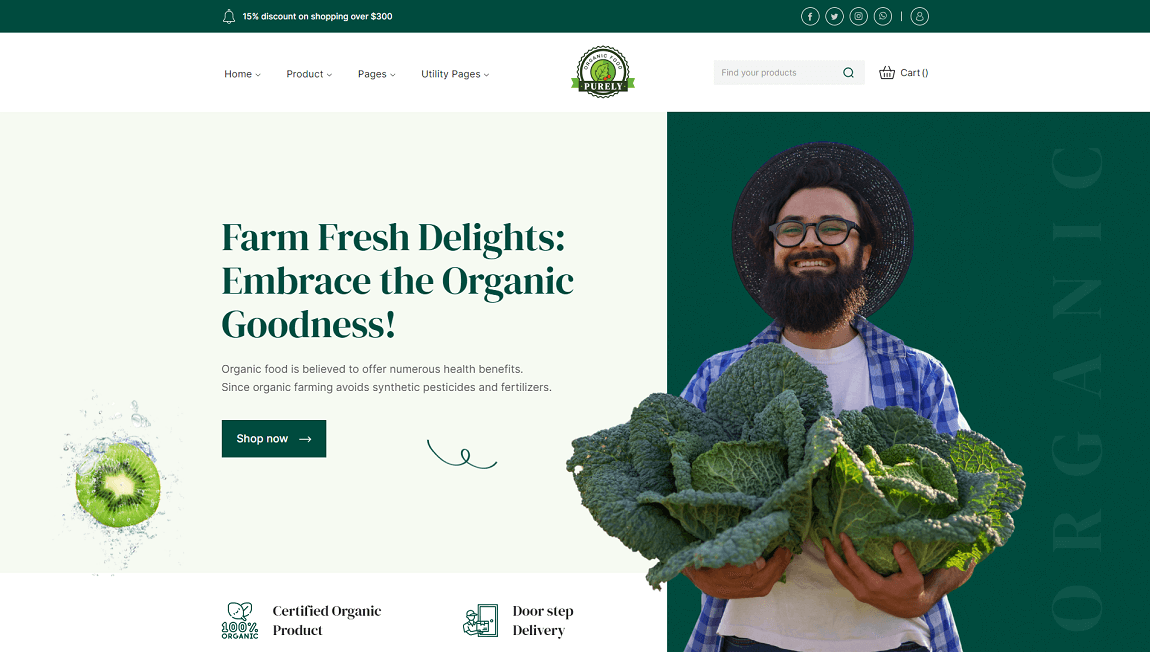
Purely - Food Website Template

If you're looking to take your eCommerce store to the next level, look no further than the Purely food website template. This cutting-edge Webflow template boasts a responsive design, ensuring that users can easily navigate your store from desktops to mobile phones. Not only that, but the template is speed-optimized, ensuring that your website's content and products load quickly on any browser. 

Plus, with the added feature of cross-browser compatibility, all users will have a seamless experience no matter what browser they're using. And let's not forget about the scrolling animations that bring your website to life. With Purely, you'll transform your eCommerce shop into a standout destination that customers won't be able to resist.

Highlighted Features:

  1. 100% Customizable
  2. Cross browser compatible
  3. Speed Optimized
  4. SEO Friendliness
  5. Srolling Animations

Price:

Regular License: $79

Hire Experts to Build Your Webflow Website: Recommended- Brandbes
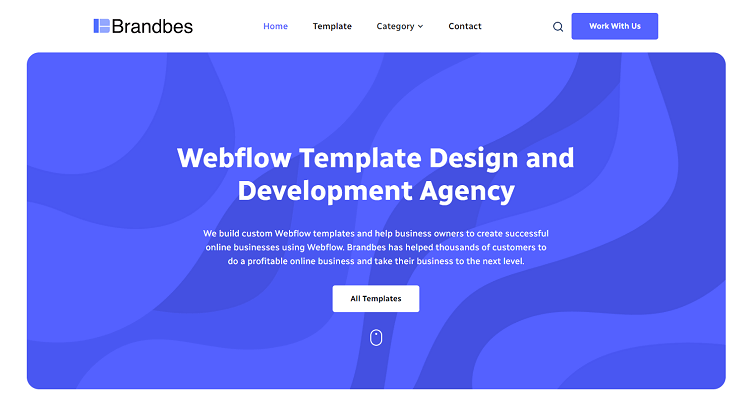
Brandbes

Elevate your online presence with expert help from Brandbes in building your Webflow website. Specializing in high-quality Webflow template designs and customized development services, Brandbes caters to diverse business needs. With deep expertise in Webflow, they have successfully supported numerous clients in achieving their online business objectives and ensuring sustainable growth.

Brandbes offers a seamless website creation experience, providing user-friendly templates and responsive designs suitable for various businesses. Their team of Webflow professionals ensures your website has super-fast loading speed, modern design, and is SEO optimized. By partnering with Brandbes, you can trust their exceptional reputation in the realm of Webflow templates. Their dedication to quality and client satisfaction makes them a reliable choice for constructing and enhancing your Webflow website, ensuring a strong digital presence for your business.

Final Thoughts

Creating a multi step form using Webflow allows you to build a seamless and engaging user experience while efficiently collecting valuable data. By following this step-by-step guidelined in this article, you'll be well-equipped to design and implement a multi-step form that will leave a lasting impression on your website visitors. So, let's dive in and master the art of creating Webflow multi step forms!

Reader Disclosure: Some of the posts on our site may contain affiliate links. Clicking may earn us a commission at no extra cost to you. Thank you for your support! Read our Disclosure

Table of content:

See more

In the world of web design, creating user-friendly forms is essential for capturing valuable data and enhancing the user experience. One popular technique for optimizing Webflow forms is by dividing them into multi steps, making them more manageable and engaging for users. 

In this article, we will explore how to create a Webflow multi step form, a powerful visual web design platform that allows you to build stunning websites without coding. Whether you're a beginner or an experienced designer, this guide will walk you through the process of creating a seamless Webflow multi step form that will delight your users.

Understanding the Benefits of Multi-Step Forms

Improved user experience and engagement

Multi step forms enhance the overall user experience by breaking down a lengthy and potentially overwhelming form into manageable sections. Users are less likely to be intimidated by a long list of fields, which can lead to frustration or abandonment. By guiding users through a series of smaller steps, they are more likely to stay engaged focused, and feel a sense of progress as they complete each step. This can result in a more positive interaction with your website or application.

Increased form completion rates

When users encounter a long, single-page form, they may be more inclined to abandon it, especially if they perceive it as time-consuming or complicated. Multi step forms can increase form completion rates because they encourage users to start the process and continue through each step. Users are more likely to finish a multistep form when they feel they've made progress. Additionally, reducing the cognitive load by presenting only a few fields at a time can make the process less daunting.

Organized and focused data collection

Multi-step forms allow you to segment the data collection process, making it easier to categorize and organize the information you gather. This approach helps ensure that you collect all the necessary data while maintaining data accuracy and consistency. Each step can be designed to collect specific information, which helps keep the user's focus on one task at a time.

Planning Your Multi-Step Form

Planning your multi step form is a crucial step in ensuring it serves its purpose effectively and provides a positive user experience. Here are some key considerations and steps to help you plan your multi-step form:

Define Your Form's Purpose

Clearly understand why you need the form. What information are you trying to collect, and what is the ultimate goal of the form? Whether it's a lead generation form, a survey, or an application form, a clear purpose is essential.

Identify the Required Information

List the specific information you need from users. This includes both mandatory and optional fields. Be mindful of user experience and avoid requesting excessive or unnecessary data.

Break the Form into Steps

Determine how to divide the multistep form into logical steps. Each step should group related information. Consider the flow and order of steps, start with essential information, and progress to optional or supporting details.

Decide on Step Titles and Descriptions:

Each step should have a clear and concise title that indicates what the user should expect. Consider adding descriptions to provide context for each step's purpose.

Choose Input Types:

Select appropriate input types for each field within the steps. For instance, use text fields for names and email addresses, radio buttons for multiple-choice questions, and text areas for longer responses.

Set Validation Rules:

Determine which fields are required and enforce validation rules for data accuracy. For example, validate email addresses and phone numbers for correct formats.

Consider Error Handling:

Plan how to handle errors and validation messages. Ensure users receive clear and helpful guidance if they enter incorrect information or miss required fields.

Optimize for Mobile and Accessibility:

Ensure your multi step form is responsive and accessible. Test it on various devices and screen sizes to make sure it functions seamlessly for all users.

30+ Top-notch Webflow Templates

Take your website design to the next level with our stunning collection of Webflow templates. making them more manageable

Step by Step Guideline on How to Create Webflow Multi Step Form

Step by Step Guide on How to Create Webflow multi step form:

Step 1: Add a script to your page's source code.

Add a script to your page's source code

The first step is inserting the script into the "Before </body> tag" in the page settings. This code will be placed within the page that will host your multi-step form.

<script src="https://cdn.jsdelivr.net/gh/videsigns/webflow-tools@latest/multi-step.js"> </script>

Step 2: Add a Form to the Page

Add a Form to the Page

After that, you have to use a Webflow form on your webpage. When you do, you can delete everything inside the 'Form' section (except the 'Form Block'). We also suggest naming your 'Form Block,' 'Form,' 'Success Message,' and 'Error Message' parts.

Step 3: Create a Custom Attribute and Add It to the Form

Create a Custom Attribute and Add It to the Form

After renaming the "Div Block" to "Form," access the element's settings. Under the "Custom Attributes" section, you should include the following:

Name: data-form

Value: multistep

Step 4: Include a Div Block for Every Step.

Include a Div Block for Every Step

Within the "Form" div, you will need to insert as many Div Blocks as there are steps in your multi-step form. For instance, add three Div Blocks if you desire a multi-step form with three stages. You can assign the same class to each Div Block, for example, "contact_step-wrapper." Each of these div blocks should have the following custom attribute:

Name: data-form

Value: step

Step 5: Customize Your Steps

Customize Your Steps

In each Div Block representing a step, insert the desired fields and customize the design. Insert a "Submit Button" in the last step.

Step 6: Add a Custom Attribute for the "Submit Button"

Add a Custom Attribute for the "Submit Button

Select the "Submit Button" element, and add the custom attribute:

Name: data-form

Value: submit-btn

Step 7: Customize Buttons for Navigation

Customize Buttons for Navigation

Add buttons in your form block to move between steps. You can have buttons for moving forward or backward.

  • Button to Go to the Next Step:
Button to Go to the Next Step

Add custom attribute:

Name: data-form

Value: next-btn

  • Button to Return to the Previous Step:
Button to Return to the Previous Step

Add custom attribute:

Name: data-form

Value: back-btn

Step 8: Specify the Fields You Need.

With this form, users won't be able to advance from one step to another unless they've completed the mandatory fields of the current step. To enable this functionality, ensure the "required" option is selected in your input settings. Note that this feature currently doesn't work with "Email" and "Phone" types, so you should use "Plain" types for these fields.

Mandatory Field in Webflow Form:

If you wish to require users to check a specific number of checkboxes before proceeding to another step within the step's parent div (e.g., "contact_step-wrapper" in our example), you should add the following custom attribute:

Name: data-checkbox

Value: n (minimum number of checkboxes to check)

Step 9: Publish Your Project

Publish Your Project

You can't preview the active multi-step form in the Designer. Publish your Webflow project to test it. The steps will be automatically hidden on the live site based on the code.

Frequently Asked Questions

Can I customize the design of each step in a multi-step form?

Yes, you can fully customize the design of each step in your multi-step form in Webflow. You can style form fields, buttons, and other elements to match your website's design.

How do I add validation to a multi-step form in Webflow?

You can add validation to your form fields in Webflow by setting them as required. Webflow's built-in validation will prevent users from progressing to the next step if they haven't filled out the required fields.

Can I track user progress in a multi-step form in Webflow?

Yes, you can track user progress by using interactions and custom code to update progress bars or step indicators as users move through the form.

How do I test and optimize a multi-step form in Webflow?

Test your multi-step form thoroughly, checking for errors, responsiveness, and user experience. Use A/B testing to optimize the form for better conversion rates and user satisfaction.

Bonus: Recommended Webflow Templates

Qlonil - Retail Website Template

Qlonil - Retail Website Template

Qlonil - Retail Website Template is a Webflow template that simplifies the launch of an online retail store with its comprehensive feature set. It boasts static pages, including three homepage choices, a shop page, and a blog page. The CMS collection includes author pages, blog categories, tags, team member profiles, and blog post pages. 

Notably, it offers a responsive design, ensuring seamless viewing across all devices. With customizable aesthetics, eCommerce functionality, and SEO-friendly attributes, the Qlonil - Webflow eCommerce Template is the ideal choice for those seeking a user-friendly eCommerce platform.

Highlighted Features:

  1. Customizable look:
  2. eCommerce capabilities
  3. SEO Friendliness
  4. Responsive Layout
  5. Blogging capabilities

Price:

Regular License: $79

Farnic - Furniture Website Template

Farnic - Furniture Website Template

The Farnic furniture website template offers a seamless experience for setting up an online store. It combines a visually appealing website with seamless functionality, all within a responsive design. Powered by advanced Webflow CMS technology, managing your site becomes intuitive.

Farnic ensures easy customer attraction through SEO-friendly coding and robust eCommerce support. Experience retina-ready visuals, lightning-fast loading speeds, and eCommerce readiness. With Farnic, managing your online store is a breeze, allowing you to relax and witness your business thrive!

Highlighted Features:

  1. Retina Ready
  2. Fast Loading Speed
  3. eCommerce Ready
  4. SEO Friendliness
  5. Responsive Layout

Price:

Regular License: $79

Pinaf - Florist Website Template

Pinaf - Florist Website Template

Discover the Pinaf Florist Website Template, designed to showcase the beauty of nature elegantly. This professional eCommerce template, powered by Webflow, empowers you to establish and oversee your online store effortlessly. It's adorned with captivating imagery of petite trees, blossoms, and plants. 

Pinaf offers complete customization, ensuring it aligns with your unique needs and preferences. Leveraging Webflow's CMS and eCommerce capabilities, managing your online store is a breeze. 

Furthermore, its speed-optimized design guarantees a swift and efficient shopping experience for your customers. The Key features include 100% customization, Webflow CMS & eCommerce integration, and top-notch speed optimization.

Highlighted Features:

  1. 100% Customizable
  2. Webflow CMS & eCommerce
  3. Speed Optimized
  4. SEO Friendliness
  5. Seamless Animations

Price:

Regular License: $79

Purely - Food Website Template

Purely - Food Website Template

If you're looking to take your eCommerce store to the next level, look no further than the Purely food website template. This cutting-edge Webflow template boasts a responsive design, ensuring that users can easily navigate your store from desktops to mobile phones. Not only that, but the template is speed-optimized, ensuring that your website's content and products load quickly on any browser. 

Plus, with the added feature of cross-browser compatibility, all users will have a seamless experience no matter what browser they're using. And let's not forget about the scrolling animations that bring your website to life. With Purely, you'll transform your eCommerce shop into a standout destination that customers won't be able to resist.

Highlighted Features:

  1. 100% Customizable
  2. Cross browser compatible
  3. Speed Optimized
  4. SEO Friendliness
  5. Srolling Animations

Price:

Regular License: $79

Hire Experts to Build Your Webflow Website: Recommended- Brandbes

Brandbes

Elevate your online presence with expert help from Brandbes in building your Webflow website. Specializing in high-quality Webflow template designs and customized development services, Brandbes caters to diverse business needs. With deep expertise in Webflow, they have successfully supported numerous clients in achieving their online business objectives and ensuring sustainable growth.

Brandbes offers a seamless website creation experience, providing user-friendly templates and responsive designs suitable for various businesses. Their team of Webflow professionals ensures your website has super-fast loading speed, modern design, and is SEO optimized. By partnering with Brandbes, you can trust their exceptional reputation in the realm of Webflow templates. Their dedication to quality and client satisfaction makes them a reliable choice for constructing and enhancing your Webflow website, ensuring a strong digital presence for your business.

Final Thoughts

Creating a multi step form using Webflow allows you to build a seamless and engaging user experience while efficiently collecting valuable data. By following this step-by-step guidelined in this article, you'll be well-equipped to design and implement a multi-step form that will leave a lasting impression on your website visitors. So, let's dive in and master the art of creating Webflow multi step forms!

Reader Disclosure: Some of the posts on our site may contain affiliate links. Clicking may earn us a commission at no extra cost to you. Thank you for your support! Read our Disclosure

Table of contents:-

See more

In the world of web design, creating user-friendly forms is essential for capturing valuable data and enhancing the user experience. One popular technique for optimizing Webflow forms is by dividing them into multi steps, making them more manageable and engaging for users. 

In this article, we will explore how to create a Webflow multi step form, a powerful visual web design platform that allows you to build stunning websites without coding. Whether you're a beginner or an experienced designer, this guide will walk you through the process of creating a seamless Webflow multi step form that will delight your users.

Understanding the Benefits of Multi-Step Forms

Improved user experience and engagement

Multi step forms enhance the overall user experience by breaking down a lengthy and potentially overwhelming form into manageable sections. Users are less likely to be intimidated by a long list of fields, which can lead to frustration or abandonment. By guiding users through a series of smaller steps, they are more likely to stay engaged focused, and feel a sense of progress as they complete each step. This can result in a more positive interaction with your website or application.

Increased form completion rates

When users encounter a long, single-page form, they may be more inclined to abandon it, especially if they perceive it as time-consuming or complicated. Multi step forms can increase form completion rates because they encourage users to start the process and continue through each step. Users are more likely to finish a multistep form when they feel they've made progress. Additionally, reducing the cognitive load by presenting only a few fields at a time can make the process less daunting.

Organized and focused data collection

Multi-step forms allow you to segment the data collection process, making it easier to categorize and organize the information you gather. This approach helps ensure that you collect all the necessary data while maintaining data accuracy and consistency. Each step can be designed to collect specific information, which helps keep the user's focus on one task at a time.

Planning Your Multi-Step Form

Planning your multi step form is a crucial step in ensuring it serves its purpose effectively and provides a positive user experience. Here are some key considerations and steps to help you plan your multi-step form:

Define Your Form's Purpose

Clearly understand why you need the form. What information are you trying to collect, and what is the ultimate goal of the form? Whether it's a lead generation form, a survey, or an application form, a clear purpose is essential.

Identify the Required Information

List the specific information you need from users. This includes both mandatory and optional fields. Be mindful of user experience and avoid requesting excessive or unnecessary data.

Break the Form into Steps

Determine how to divide the multistep form into logical steps. Each step should group related information. Consider the flow and order of steps, start with essential information, and progress to optional or supporting details.

Decide on Step Titles and Descriptions:

Each step should have a clear and concise title that indicates what the user should expect. Consider adding descriptions to provide context for each step's purpose.

Choose Input Types:

Select appropriate input types for each field within the steps. For instance, use text fields for names and email addresses, radio buttons for multiple-choice questions, and text areas for longer responses.

Set Validation Rules:

Determine which fields are required and enforce validation rules for data accuracy. For example, validate email addresses and phone numbers for correct formats.

Consider Error Handling:

Plan how to handle errors and validation messages. Ensure users receive clear and helpful guidance if they enter incorrect information or miss required fields.

Optimize for Mobile and Accessibility:

Ensure your multi step form is responsive and accessible. Test it on various devices and screen sizes to make sure it functions seamlessly for all users.

Reader Disclosure: Some of the posts on our site may contain affiliate links. Clicking may earn us a commission at no extra cost to you. Thank you for your support! Read our Disclosure

Arrow Image