Webflow scroll animations are a great way to add flair and visual interest to your web pages. They can also be used to improve the user experience by providing feedback or helping users orient themselves on the page. In this guide, we will discuss how to scroll animations work and provide tips for creating them using Webflow.
Overview of Scroll Animations
Webflow scroll animations add a sense of engagement and dynamism to a website, quickly grabbing viewers’ attention as they explore its content. For example, as users scroll down the page, images may fade in, dropdown menus may appear, and text or logos may shift around, creating an interactive experience that immerses visitors in your site’s message.
It adds flair to a webpage and provides visual stimulation that can help you direct people’s eyes toward certain elements on a page. This can help better explain how a product or service works, preserving engagement and potentially driving more sales.
How Webflow Scroll Animation Works
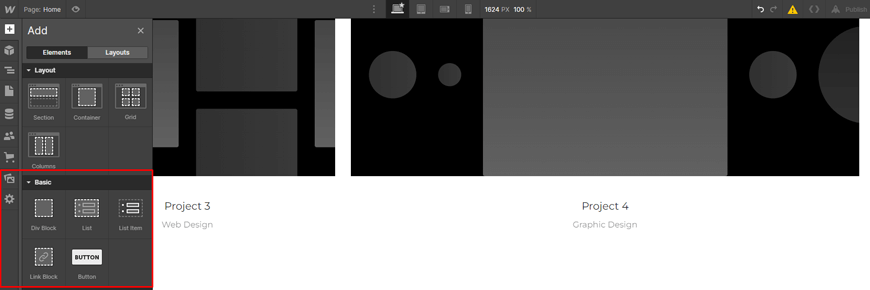
Creating Webflow scroll animations on a website can be an exciting way to make your content more interactive and engaging. Webflow has a great way of creating an animation scroll view animation, which doesn’t require coding knowledge. Here’s how you do it —
Create the trigger
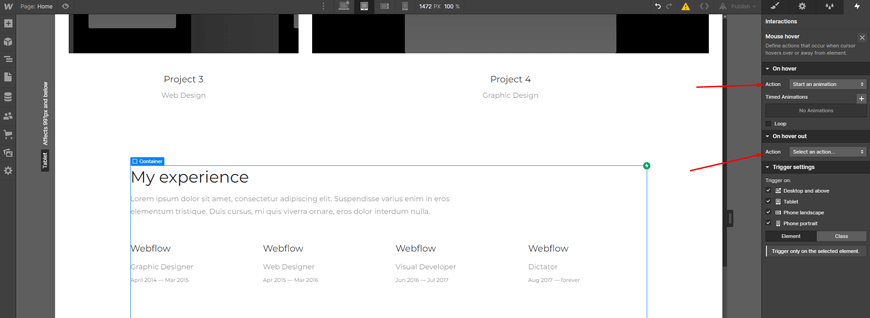
Select your desired triggering element, such as a project link, and click on the Interactions panel. Then click on the plus sign next to Element Trigger, and choose Scroll Into View from the dropdown menu – that’s it! With this relatively easy process, you can add more fun to your Webflow site in no time.

Create the animation
1. Crafting beautiful animation effects can really elevate your website and draw potential customers in. After deciding to add an animation, the next step is to set it up.

2. From the Action menu under When Scrolled Into View, choose to Start an Animation and then click on the plus sign next to Timed Actions.
3. Name something that easily explains the animation, such as ‘Move up on scroll.’

4. Then you’ll select ‘Move from the dropdown menu‘ and change the y-axis to 50 pixels to move the element offscreen when they first enter your page.

5. After this, toggle on Set as the initial state and move on to setting up opacity.
Change the opacity to 0%, followed by another toggle of Set as Initial state so that it fades into scroll view.
6. Lastly, customize your effect to smooth while providing an aesthetically pleasing transition between each stage!
30+ Top-notch Webflow Templates
Take your website design to the next level with our stunning collection of Webflow templates.
Apply the animation to more components.
Once you’ve finished setting up your animation effects, the next step is to apply them to other elements. To do this, click into the Interactions panel and adjust the trigger settings to apply the animation to all elements with a specified class.
For example, if you want a single animation to be applied across multiple project links on your page, select ‘Class: Project Link’ from the dropdown menu. This will ensure every element matching this criterion responds similarly when triggered. With this in place, you can now rest assured any transition animations across your website are cohesive and consistent.
Benefits of Using Scroll Animations
Scroll animations offer an engaging way to draw viewers deeper into a website. The use of parallax scrolling and other visually pleasing motions can make the content appear more interactive and immersive. It has been found that watch times on web pages significantly increased when scroll animations were used, as visitors stayed longer to investigate and appreciate the design.
However, developers need to ensure that Webflow scroll animations are balanced, as too much motion can be jarring and confuse visitors. On the other hand, when used skillfully, scroll animations can encourage viewers to stay longer on a page and encourage them to click deeper into the website.
Frequently Asked Questions
- What are Webflow’s Animated Scrolls?
Webflow’s Animated Scrolls (WAS) is a powerful design tool that enables you to create custom, interactive website animations. In addition, WAS allows users to make website elements respond when they scroll through the page. This technology helps add energy and dynamism to an otherwise static page, creating more engaging visitor experiences.
- What are some of its features?
Webflow’s Animated Scrolls come with a number of influential design features, including Drag and drop interface, Responsive layouts, Timing functions, and In-browser preview.
- Can I add my own animations?
Yes! Webflow scroll animations also come with tools for customizing your own animations and designing unique interaction sequences. All you need is a basic understanding of code, and you can create whatever you can imagine!
Wrapping Up – Final Thoughts on the Power of Webflow’s Animated Scrolls
Webflow provides the power to create interactive and engaging web experiences through its animated scroll features. With ingenuity, these effects can add scroll to create colorful and dynamic flair to any website design.
The ability to control elements, timing, direction, and duration of animation makes Webflow an invaluable resource for web designers looking to level up their work. In just a few simple clicks, designers can make their sites alive with custom animations that will wow their audiences as they scroll down the page.
30+ Top-notch Webflow Templates
Take your website design to the next level with our stunning collection of Webflow templates.
Reader Disclosure: Some of the posts on our site may contain affiliate links. Clicking may earn us a commission at no extra cost to you. Thank you for your support! Read our Disclosure


